> ## Documentation Index
> Fetch the complete documentation index at: https://docs.flowpayroll.ai/llms.txt
> Use this file to discover all available pages before exploring further.
# Importing data from CSV
> Use the CSV importer to bring employees, payments, pay elements, journal templates, and statutory payments into Flow Payroll — and save the column mapping once so every future import is one click.
Flow Payroll uses one import wizard everywhere a CSV can be uploaded. Export a file from your HR platform or previous payroll system as-is — you don't need to rearrange columns or match a fixed layout. The importer maps your columns to Flow's fields, and once you save that mapping, every future export from the same system is recognised automatically.
 ## Where you can import
| Data | Where to find it | Guide |
| - | - | - |
| Employees (new starters or migration) | **People** → **Team** → **Import CSV** | [Onboarding employees](/guides/people/onboarding-employees#importing-employees-via-csv) |
| Payments in a pay run | Pay run → **Import CSV** | [Running a pay run](/guides/pay-runs/running-a-pay-run#importing-payments-from-csv) |
| Pay elements | **Settings** → **Pay elements** → **Import from CSV** | [Pay elements](/guides/setup/pay-elements#importing-pay-elements-from-csv) |
| Journal templates | **Settings** → **Journals** → **Import** | [Payroll Journals](/guides/pay-runs/payroll-journals#importing-mappings-from-another-system) |
| Statutory payments | **People** → **Statutory payments** → **Import CSV** | [Statutory payments](/guides/compliance/statutory-payments#importing-statutory-payments-from-csv) |
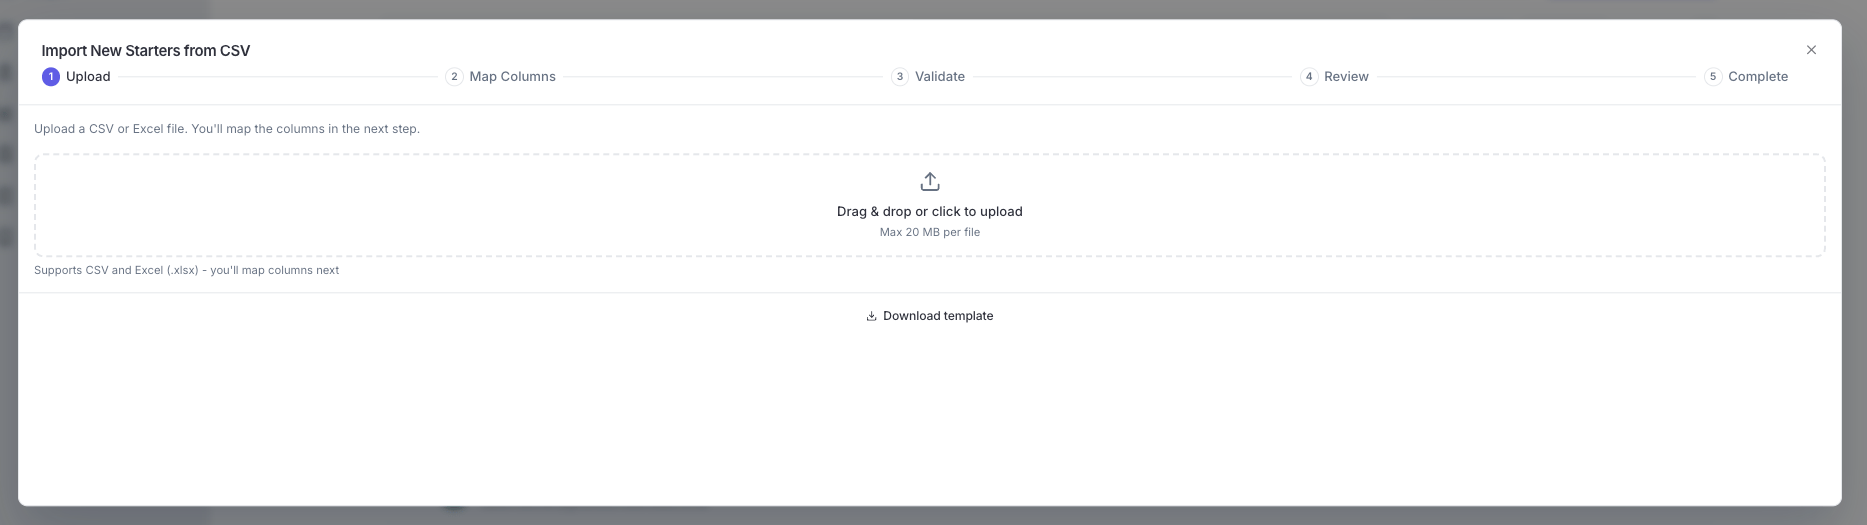
Each import accepts different columns, but the wizard itself always works the same way. Every import moves through five steps: **Upload**, **Map Columns**, **Validate**, **Review**, and **Complete**.
## Step 1 — Upload
Drag and drop a file, or click to browse. The importer accepts:
* **CSV** (`.csv`)
* **Excel** (`.xlsx` or `.xls`) — Flow picks the sheet with your data automatically
* One file at a time, up to **20 MB**
You don't need to clean the file first. The importer finds the header row on its own — title rows or notes above your data are skipped — and blank rows are ignored. Duplicate column names are kept apart automatically.
Click **Download template** at the bottom of the upload step to get a starter file for that import: one header row with every available column, plus an example row showing the expected format. The same templates are available in each guide linked above — with a download link — so you can grab them without opening the wizard.
## Step 2 — Map Columns
The mapping step lists every Flow field with the CSV column it matched, a default value, and sample values from your file so you can sanity-check each match at a glance.
## Where you can import
| Data | Where to find it | Guide |
| - | - | - |
| Employees (new starters or migration) | **People** → **Team** → **Import CSV** | [Onboarding employees](/guides/people/onboarding-employees#importing-employees-via-csv) |
| Payments in a pay run | Pay run → **Import CSV** | [Running a pay run](/guides/pay-runs/running-a-pay-run#importing-payments-from-csv) |
| Pay elements | **Settings** → **Pay elements** → **Import from CSV** | [Pay elements](/guides/setup/pay-elements#importing-pay-elements-from-csv) |
| Journal templates | **Settings** → **Journals** → **Import** | [Payroll Journals](/guides/pay-runs/payroll-journals#importing-mappings-from-another-system) |
| Statutory payments | **People** → **Statutory payments** → **Import CSV** | [Statutory payments](/guides/compliance/statutory-payments#importing-statutory-payments-from-csv) |
Each import accepts different columns, but the wizard itself always works the same way. Every import moves through five steps: **Upload**, **Map Columns**, **Validate**, **Review**, and **Complete**.
## Step 1 — Upload
Drag and drop a file, or click to browse. The importer accepts:
* **CSV** (`.csv`)
* **Excel** (`.xlsx` or `.xls`) — Flow picks the sheet with your data automatically
* One file at a time, up to **20 MB**
You don't need to clean the file first. The importer finds the header row on its own — title rows or notes above your data are skipped — and blank rows are ignored. Duplicate column names are kept apart automatically.
Click **Download template** at the bottom of the upload step to get a starter file for that import: one header row with every available column, plus an example row showing the expected format. The same templates are available in each guide linked above — with a download link — so you can grab them without opening the wizard.
## Step 2 — Map Columns
The mapping step lists every Flow field with the CSV column it matched, a default value, and sample values from your file so you can sanity-check each match at a glance.
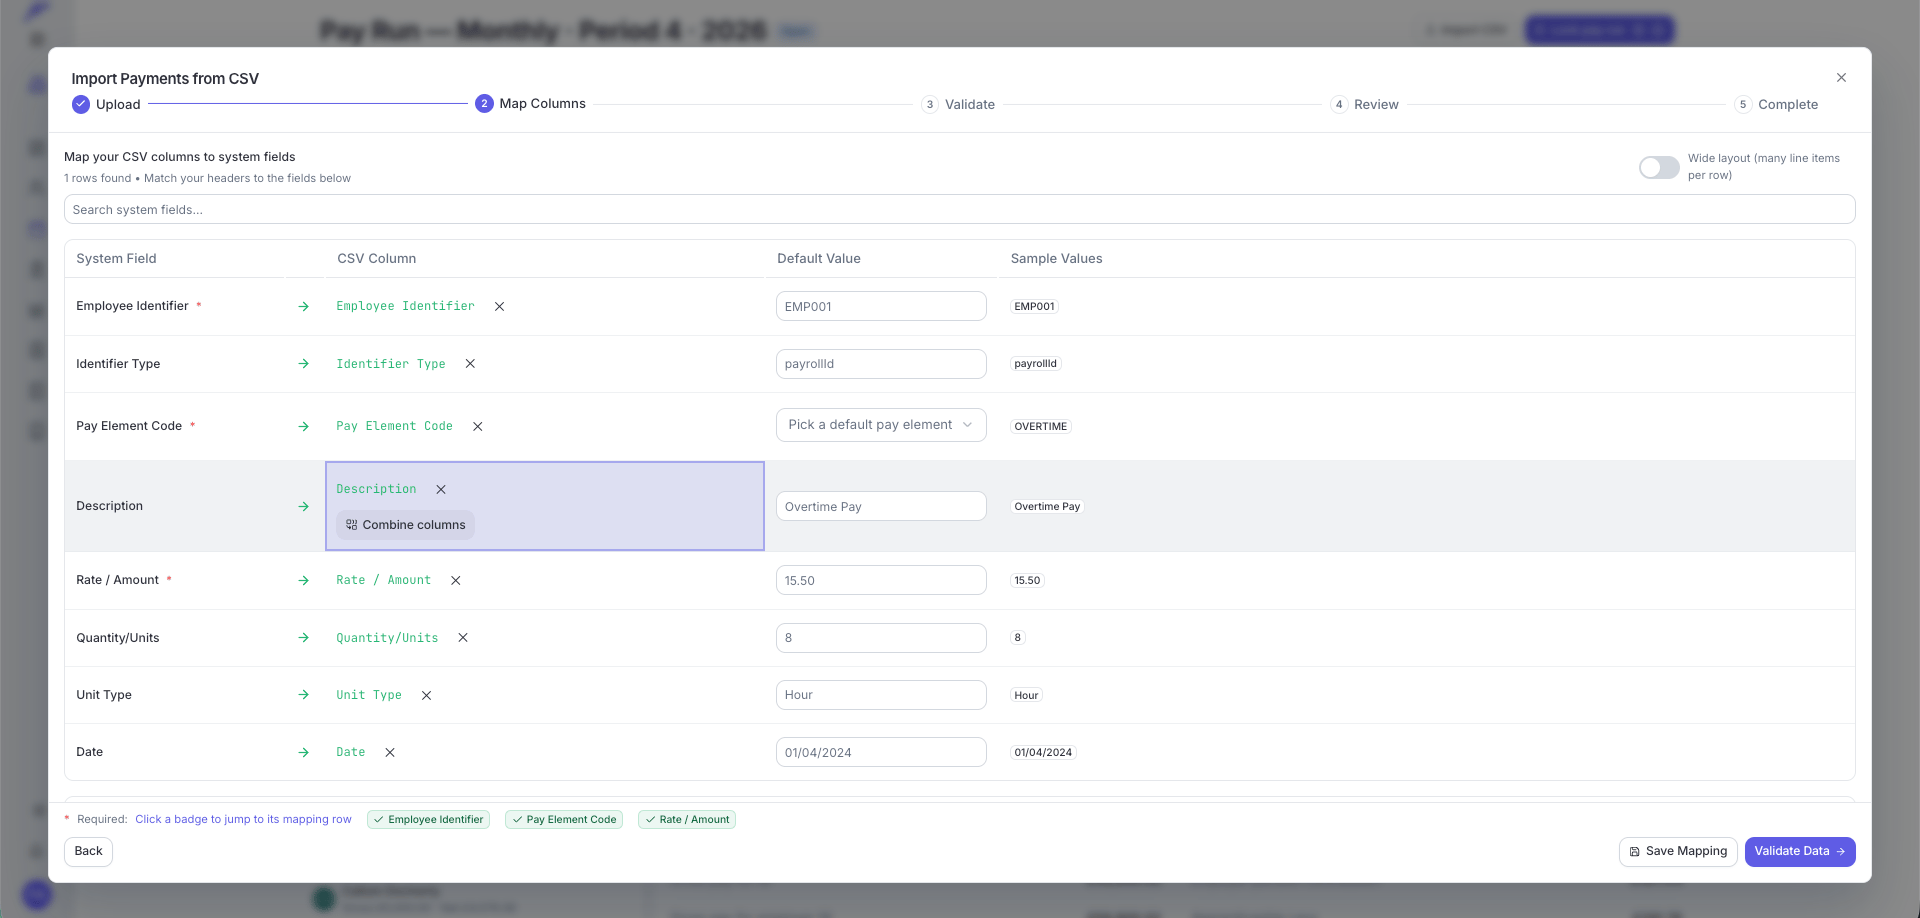 * **Auto-matching** — the importer recognises a wide range of header names for each field ("Date of birth", "DOB", and "BirthDate" all map to the birth date field). On employee imports each match also gets a confidence badge: green **High confidence** matches are safe to accept, amber **Review match** ones deserve a look.
* **Required fields** — fields marked `*` must be mapped before you can continue. The badges along the bottom of the step show each required field, green with a tick once it's satisfied; click a badge to jump to its row.
* **Default value** — every field takes an optional default, applied whenever the CSV cell is empty or the field has no column at all. Setting a default satisfies a required field, which is handy when your export simply doesn't carry a column Flow needs (for example, a fixed **Payroll Config** for every imported employee).
* **Combine columns** — on description fields you can build the value from several columns instead of one. Click **Combine columns** and type a template such as `{Site} – {Shift}`; typing `{` opens a column picker, and a live preview shows the result from your first row. If a column is empty for a row, the separator next to it is dropped, so you never import dangling dashes.
* **Search** — with long field lists (employee imports have 60+), use **Search system fields...** to jump to a field.
Payments and employee imports also let you attach **tag mappings** — tags applied to every imported row, from a CSV column or a fixed value. See [running a pay run](/guides/pay-runs/running-a-pay-run#importing-payments-from-csv) for details.
## Save the mapping once, reuse it forever
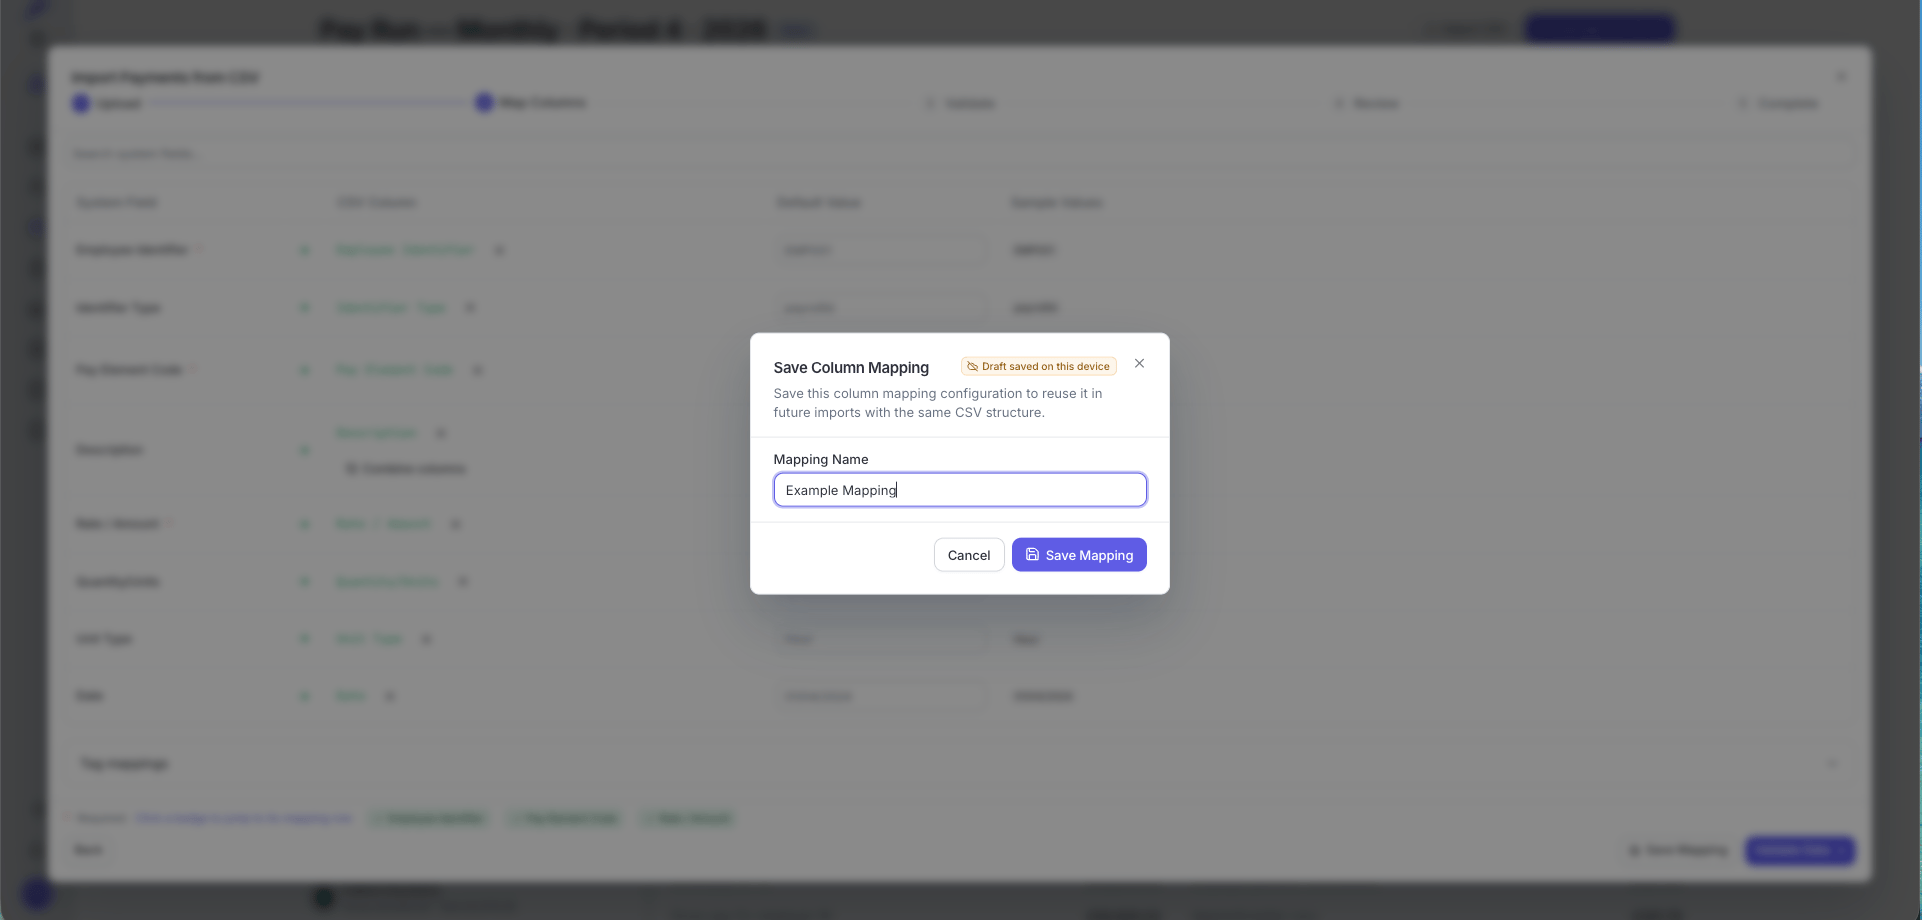
Mapping columns is a one-time job. When you're happy with the mapping, click **Save Mapping**, give it a name — "BambooHR export", "Sage payroll lines" — and it's stored for your whole organisation.
* **Auto-matching** — the importer recognises a wide range of header names for each field ("Date of birth", "DOB", and "BirthDate" all map to the birth date field). On employee imports each match also gets a confidence badge: green **High confidence** matches are safe to accept, amber **Review match** ones deserve a look.
* **Required fields** — fields marked `*` must be mapped before you can continue. The badges along the bottom of the step show each required field, green with a tick once it's satisfied; click a badge to jump to its row.
* **Default value** — every field takes an optional default, applied whenever the CSV cell is empty or the field has no column at all. Setting a default satisfies a required field, which is handy when your export simply doesn't carry a column Flow needs (for example, a fixed **Payroll Config** for every imported employee).
* **Combine columns** — on description fields you can build the value from several columns instead of one. Click **Combine columns** and type a template such as `{Site} – {Shift}`; typing `{` opens a column picker, and a live preview shows the result from your first row. If a column is empty for a row, the separator next to it is dropped, so you never import dangling dashes.
* **Search** — with long field lists (employee imports have 60+), use **Search system fields...** to jump to a field.
Payments and employee imports also let you attach **tag mappings** — tags applied to every imported row, from a CSV column or a fixed value. See [running a pay run](/guides/pay-runs/running-a-pay-run#importing-payments-from-csv) for details.
## Save the mapping once, reuse it forever
Mapping columns is a one-time job. When you're happy with the mapping, click **Save Mapping**, give it a name — "BambooHR export", "Sage payroll lines" — and it's stored for your whole organisation.
 The next time anyone in your organisation uploads a file with the same structure, Flow recognises the headers and offers the saved mapping straight away:
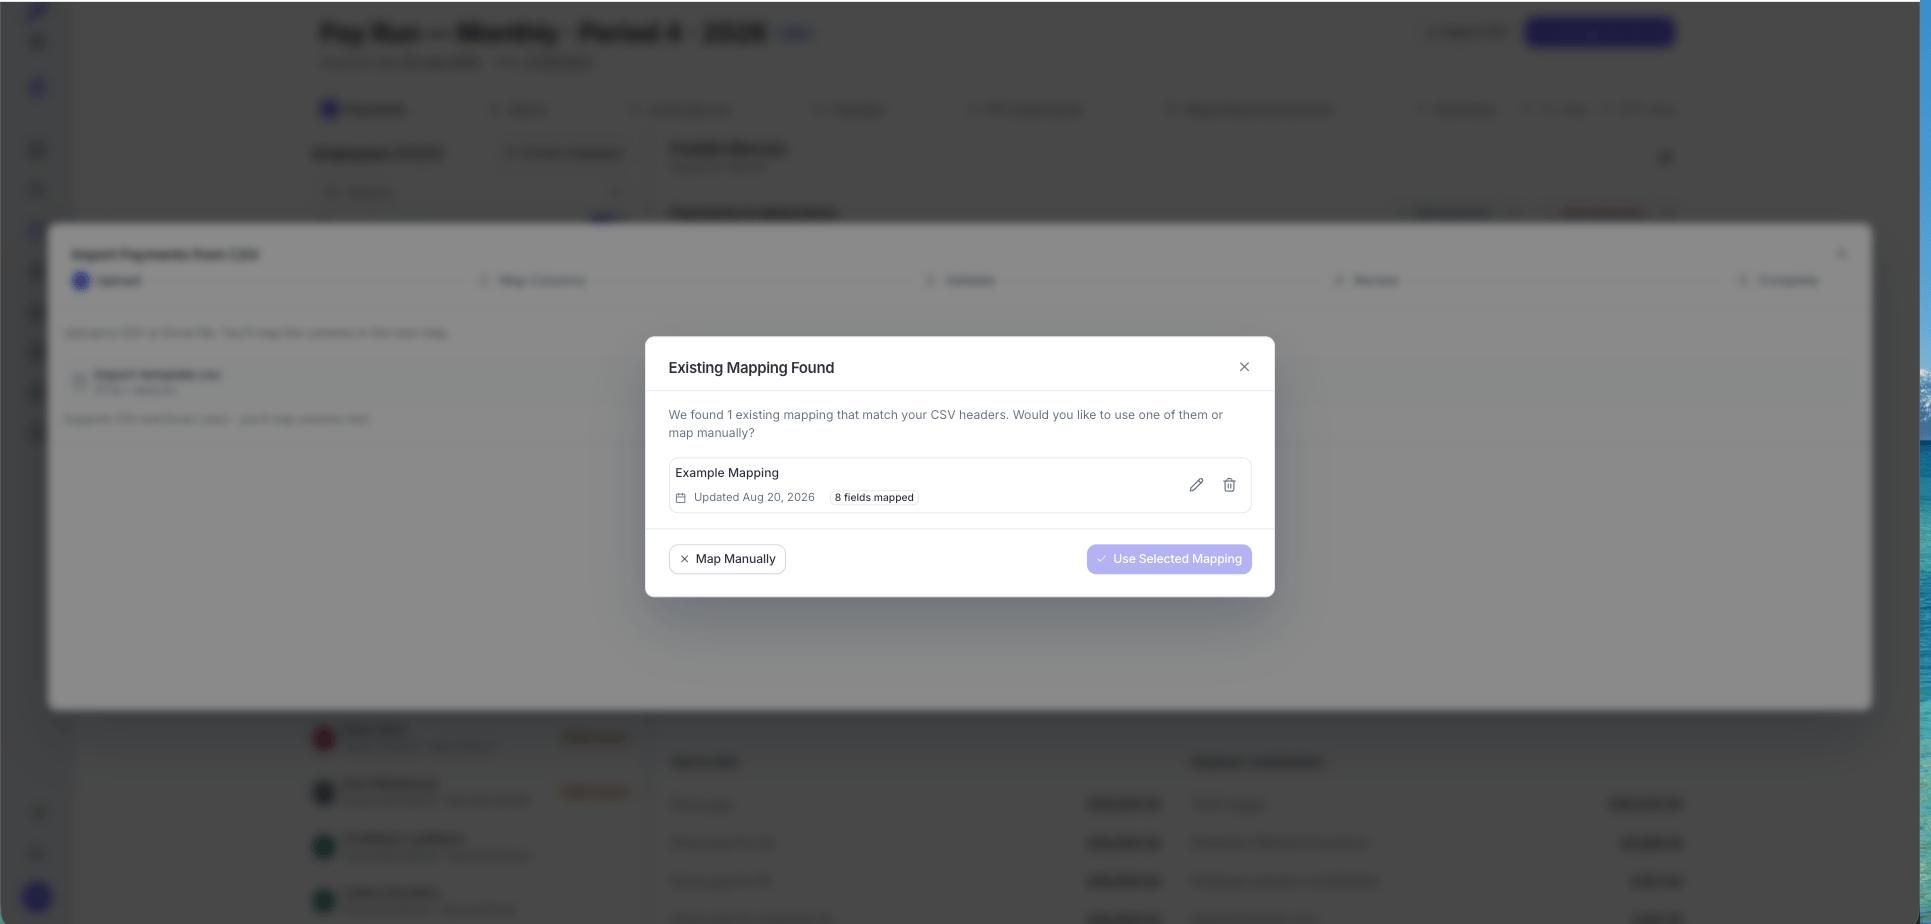 Click **Use Selected Mapping** and the wizard skips the mapping step entirely, jumping straight to validation — column matches, default values, combined-column templates, and tag mappings are all restored exactly as you saved them. Click **Map Manually** to ignore the suggestion and map from scratch.
A few things worth knowing:
* Saved mappings are shared across your organisation and scoped to the import type — an employee mapping is never offered on a payments import.
* To change a saved mapping, load it, adjust the columns, and click **Update mapping** — or **Save as new** to keep both versions.
* Rename or delete a mapping from the pencil and bin icons wherever it's listed.
* The **Draft saved on this device** badge in the save dialog refers only to the name you're typing, kept in your browser. The mapping itself is only stored once you click **Save Mapping**.
## Steps 3 and 4 — Validate and Review
Every row is checked against the same rules as manual entry — formats, required values, and consistency (for example, that a pay element code actually exists). The review step then summarises the result in four cards — **Total Rows**, **Valid**, **Warnings**, **Errors** — and clicking a card filters the row table beneath it.
* **Rows with warnings are imported.** Warnings flag things worth checking — an unusually high amount, an odd postcode — but don't block the row.
* **Rows with errors are skipped.** The import goes ahead with the valid rows; errored rows are left out.
* **Errors can't be edited in the wizard.** Click **Download Errors** to get a CSV of just the failed rows with a column describing each problem, fix it in your spreadsheet, and re-upload — your saved mapping makes the second pass instant. Alternatively, go **Back to mapping** if the fix is a wrong column match or a missing default.
Click **Import N Rows** to run the import.
## Step 5 — Complete
The final step confirms how many rows were imported. If any rows failed at this stage — for example, a conflict with an existing record — they're listed with the reason, and **Download Failures** gives you a CSV of just those rows to correct and re-import. On a fully successful import the page refreshes automatically after a few seconds.
## Where to go next
Import new starters or migrate a whole workforce, year-to-date figures included.
Import payments in bulk — including the wide layout for one-row-per-employee files.
Set up or import the pay elements your payment lines reference.
Bring active SSP, SMP, and other statutory payments over from a previous provider.
Import journal mappings from Sage, Xero, Staffology, IRIS, and other systems.
This documentation is built and hosted on [Mintlify](https://mintlify.com), a developer documentation platform.
Click **Use Selected Mapping** and the wizard skips the mapping step entirely, jumping straight to validation — column matches, default values, combined-column templates, and tag mappings are all restored exactly as you saved them. Click **Map Manually** to ignore the suggestion and map from scratch.
A few things worth knowing:
* Saved mappings are shared across your organisation and scoped to the import type — an employee mapping is never offered on a payments import.
* To change a saved mapping, load it, adjust the columns, and click **Update mapping** — or **Save as new** to keep both versions.
* Rename or delete a mapping from the pencil and bin icons wherever it's listed.
* The **Draft saved on this device** badge in the save dialog refers only to the name you're typing, kept in your browser. The mapping itself is only stored once you click **Save Mapping**.
## Steps 3 and 4 — Validate and Review
Every row is checked against the same rules as manual entry — formats, required values, and consistency (for example, that a pay element code actually exists). The review step then summarises the result in four cards — **Total Rows**, **Valid**, **Warnings**, **Errors** — and clicking a card filters the row table beneath it.
* **Rows with warnings are imported.** Warnings flag things worth checking — an unusually high amount, an odd postcode — but don't block the row.
* **Rows with errors are skipped.** The import goes ahead with the valid rows; errored rows are left out.
* **Errors can't be edited in the wizard.** Click **Download Errors** to get a CSV of just the failed rows with a column describing each problem, fix it in your spreadsheet, and re-upload — your saved mapping makes the second pass instant. Alternatively, go **Back to mapping** if the fix is a wrong column match or a missing default.
Click **Import N Rows** to run the import.
## Step 5 — Complete
The final step confirms how many rows were imported. If any rows failed at this stage — for example, a conflict with an existing record — they're listed with the reason, and **Download Failures** gives you a CSV of just those rows to correct and re-import. On a fully successful import the page refreshes automatically after a few seconds.
## Where to go next
Import new starters or migrate a whole workforce, year-to-date figures included.
Import payments in bulk — including the wide layout for one-row-per-employee files.
Set up or import the pay elements your payment lines reference.
Bring active SSP, SMP, and other statutory payments over from a previous provider.
Import journal mappings from Sage, Xero, Staffology, IRIS, and other systems.
This documentation is built and hosted on [Mintlify](https://mintlify.com), a developer documentation platform.